Cookie Policy
Privacy Policy

New Year's Eve Nails || Nude Sparkle ♥

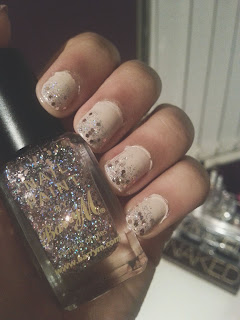
Seen as thought its the end of year, and new years eve is tomorrow...I decided to add some sparkle onto my nails! If the rest of me is a mess I do not care - as long as my nails look good I am a very happy girl! Instead of just having my stand accent nail or applying glitter all over. I decided to step out of my usual zone and attempted a glitter gradient..and here are the results.
New Year's Eve Nails || Nude Sparkle
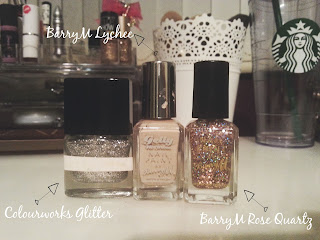
I love the way that it has turned out, I used the Colourworks Glitter on top first to build up the gradient and then used the barrym one. Having small and big glitters in this bottle made it so much easier to use and I didn't use any sponges or anything fancy! Easy as pie! 
New Year's Eve Nails || Nude Sparkle


New Year's Resolutions for 2014 ♥

Every year my family and I set our selves resolutions for the year that is going to happen, as we are nearly in 2014 I thought I would share some of my life and blogging resolutions on here with you all. Many people don't follow the tradition of setting themselves 'targets' to reach, but for me it more of a motivator and helps me to succeed and achieve. Everyone is different and wants to reach for different things and here are a few of mine, I will hopefully reflect on these in 6 months time and maybe even this time next year. 

As far as blogging is concerned there are so many things that I could write in this post, but I want to make them realistic and ones that I know that I can achieve. 
1. First up is one that I know will happen as it just has to! I would like to buy a domain name for this blog, so instead of '.blogspot.com' it would be 'classandglitter.com' not only does it sound much better but it looks so much better when you write it everywhere!
2. Next I want to get into a routine, in stead of always getting stressed and always rushing some of the posts I want to relax when writing the posts and not feel the pressure to always post. I know that this seems silly but I want to enjoy the posts that I write and then this way you can enjoy them as well. I want to also get into a routine of when I post and from what I have planned so far, this is already working out!
3. Quality of photos that I put on this blog has defo improved in my personal opinion! From a dodgy phone to my old digital camera and now my newer improved phone - samsung galaxy s3 - the photos are so much better. During blogmas I edited all the photos and I found that editing them on photoshop (which I am still learning a lot about!) makes them look so much better and higher in quality. I am hoping to buy a tripod or some form of stand to take pictures of outfits and viewpoint pictures instead of roping my brother in to help! 
4. There will also be alot of improvements going on when you visit the blog each time, I want to change it up a little bit!

Next up is just more of a general resolution, and that is to enjoy my self this year and look after not only myself but everyone around me. I have a great deal of things lined up and can't wait to go to these places and have a fun time with the people I love. I think that every woman out there sets themselves the goal of losing weight every year or a certain month, for me I want to feel good and look good. I would class myself as someone who eats healthy and as a veggie I kind of do! But I do have the odd treat every now and then and there is nothing wrong with that! The quote below pretty much sums it up!
I would also like to improve my skin, I have very acne/sensitive prone skin and a way to help this is to set my self a skincare routine in stone and STICK TO IT. This will be the only way that my skin will slowly improve over time. I also want to expand with the colours I use and experiment with the colours that I use on my eyes and my lips as I think it makes all the difference to your overall look.

And that is it! I hope you didn't find this too much of a ramble! Let me know your resolutions for the upcoming year! HAPPY NEW YEAR! 


Blogmas Day 22 || Sally Hansen Nail-growth Miracle Serum Review♥

A while back now, I set myself a challenge to improve my nails which you can read in more detail here. But to tell you the truth I gave up around the end of August as I didn't really have the time to keep up with it all. Then when i was browsing the web I came across this Sally Hansen Nailgrowth Miracle Serum. I read a few reviews and decided to purchase it so that I would be able to use a product to really strength my nails. It claims to help the nails grow stronger naturally as well as perfecting your cuticles at the same time. The formula is enriched with biotin that allows the nails to become resistant to any damage! Everything that I wanted in one little bottle.
There are two ways of using this serum, you can either use the pipette and squeeze then massage on to your bare nails or on top of you nail colour which is the one that I have been doing more than the other. The end result? AMAZING! My nails have improved so much overall, they are so much more stronger, longer and defo more healthier. I knew that Sally Hansen was the best choice!
Sally Hansen Nail-growth Miracle Serum Review

Sally Hansen Nail-growth Miracle Serum ReviewSally Hansen Nail-growth Miracle Serum Review

Both my Left and Right hands

Blogmas Day 21 || DIY Wrapping ♥


We are nearly there my friends, 4 days to go till the big day! I am so excited and one thing that I love to do every year at the time is wrapping presents! Some people hate it, but I love it! When I went Xmas shopping a few weeks ago, I spotted lots of shops selling wrapping paper that looks just like parcel paper but fancy!
DIY Wrapping
Buy here
So I bought out the DIY queen that is inside of me and made my own version-ish! And it is super cheap and affordable and looks so different to anything else.
DIY Wrapping
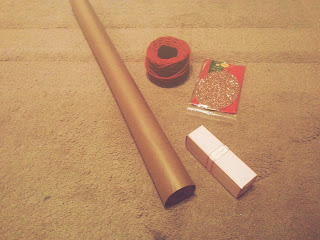
You Will Need;
- Parcel Paper Roll
-  Thick String/Ribbon
-Tags
- Present to Wrap
- Scissors
-Sellotape
DIY Wrapping
The first thing you want to do is cut out your parcel paper so that you have enough to wrap you present lik you would using wrapping paper. 
DIY Wrapping
Once its wrapped you can wrap your string or ribbon around it, I used red as I thought it looked really nice! But Silver,Gold, Black or even White would look really pretty as well. 
DIY Wrapping
When you've done that you want to attach your tag and write a sweet merry message on it and you've done! I think that it looks so pretty and works really together. 
DIY Wrapping
I actually ended up wrapping all my presents up, and it looks so pretty when it comes together and is under the tree!

Hope you enjoyed this very different blogmas post and I will see you all tomorrow!